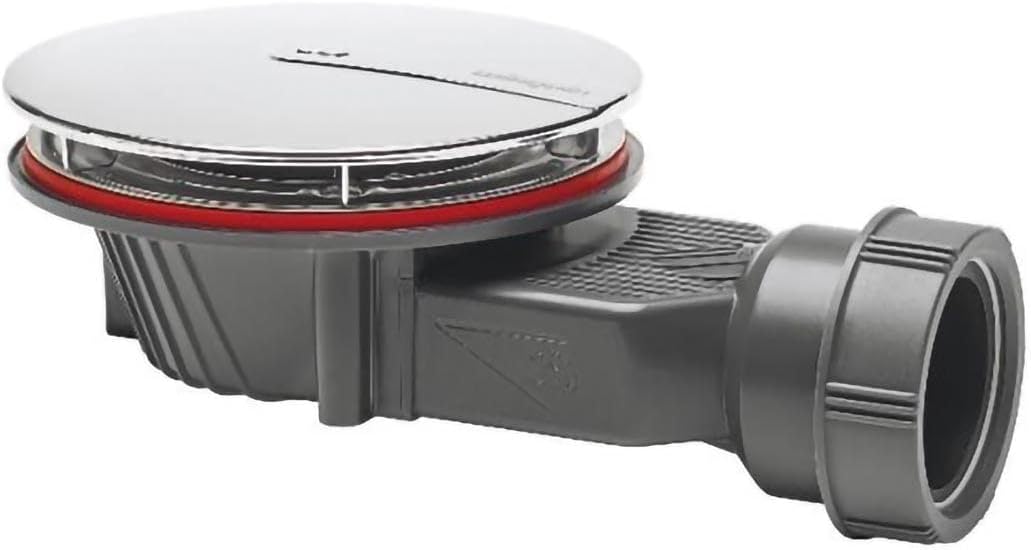
Wirquin Slim Extra Flat Low Profile Shower Trap Waterless Membrane For 90mm Dia Shower Trays
FREE Shipping
Wirquin Slim Extra Flat Low Profile Shower Trap Waterless Membrane For 90mm Dia Shower Trays
- Brand: Unbranded

Description
Tighten it so that it is “pinch” tight e.g. tighten it as much as you can by hand and then one final turn to pinch it up and seal it. You don’t need to over tighten it! The first job is to remove the old tray if it’s still in place. Depending on how it’s fixed, this can be fairly straightforward or a bit of a nightmare.
Low Profile Shower Trays Low Profile Shower Trays
By tiling down to the tray and leave a 2-3mm gap between the tiles and the tray you can fully seal this with silicone and allow for any expansion and contraction as the silicone itself will absorb this and reduce the risks of any leaks. Before placing the tray down in place, we first replaced the sections of flooring that had been removed that would sit under the shower tray. At the end of the tray we also created a trap door. This was simply a section of flooring that could be easily unscrewed and removed so that we could access the waste. The final task once the internal sealing is done is to then seal the gap at the front between the shower tray and the floor. Fitting or installing shower trays can be a DIY job but the utmost care must be taken to ensure that the tray is both fully sealed, waterproof and also totally level on the base it’s sitting on once it’s in place. The shower tray waste trap was then fixed in place on the tray. This was just a simple matter of unscrewing the top section, positioning the main cup section and seal under the tray and then screwing the top section and seal down.
If you’re happy with the general fitment, you then need to establish the best possible route for your waste pipe if this isn’t already in place. Attach the waste to your tray then connect this to the trap. Step 3 - Level the Tray
Low Profile Shower Trays - Stone Resin Shower Tray Low Profile Shower Trays - Stone Resin Shower Tray
On first inspection of the walls it was apparent that many of the tiles had come loose also so all of these were also removed. In this example we will be replacing an old 900×900 quadrant shower tray with a new 900×900 low level quadrant shower tray. As mentioned already, you should always install your shower tray first and then tile down to it. Due to the extremes in temperature in a bathroom and the resulting expansion and contraction, everything moves a fair bit.In general, if you are installing on to a floating timber floor, a flat low profile tray is the way to go as the flat base will provide great support for the tray and also access to the underside of the tray for the waste should be fairly straight forward as you can simply cut a hole in the floor. This way you can then use the existing waste, minimizing the amount of work needed as repositioning a waste pipe can be a nightmare as you never quite know what’s going on under the floor! Remove old tray, inspect the shower area and repair any damage A hole will also need to be cut for your shower tray wasteso take some accurate measurements and very carefully start creating the space you need. Once this is done you can go ahead and assemble the waste itself. Step 4 - Lay Mortar In our example here we have had to remove a chunk of the floor as it was rotten so this has given us a good heads up on how the existing waste runs. As I’m sure you can imagine, digging up a solid concrete floor to trace an existing shower waste pipe to a main drain, moving that pipe to a new position or running a new pipe and then covering it over is a fair amount of work.
Shower Tray | DIY Doctor How to Fit a Shower Tray | DIY Doctor
Once the grout has cured you can then seal up the gap between the top of eth tray and the tiles. Use a suitable silicone, in this case we used Everbuild Forever White as we find it to be really good. Likewise with a floating timber floor, you can almost guarantee that there will be a supporting wall or other obstacle right where your new waste needs to go! To fix your shower tray firmly to the floor, the best stuff to use is a strong construction adhesive. Clean the base thoroughly first to remove any grease and grime and then spread it evenly in beads over the base of the tray. A small channel was also cut at the front of the hole as the waste connection protruded out of the waste by a few inches. Next, mark the floor area inside the tray waste so that you know exactly where you need to cut the hole for the waste.As we have mentioned installing a new shower tray with the waste in the same position as the old one should minimize potentially a great deal of work. As we had to replace most of the floor area that the tray would be sitting on, this gave us the opportunity to ensure that the floor would be totally flat and level for the tray to sit on.
How to Install a Shower Tray | Victorian Plumbing How to Install a Shower Tray | Victorian Plumbing
Once the tray has set and is fully secured, the waste can now be connected up. In this case we were using the existing waste so we pushed the end of the waste pipe up under the floor (with the screw cap, washer and tapered rubber seal in place) and using a torch, located it within the connection on the tray’s waste trap. It is highly important to fix the tray to the floor firmly and prevent any movement. If any movement occurs, even very slight, over time, not only will any sealing around the tray fail but it will also loosen the waste and cause leaks. After removing the old tray it was found that a long term leak had caused a fair amount of damage to the walls and floor that would all need to be replaced before the new tray was installed in place. To leave a gap to enable tiling down to the tray we fixed a section of batten horizontally level across each wall around an inch above the tray and then tiled up the wall.
How Does Fast Flow Shower Waste Work
Installing or fitting a shower tray is very much dependent on the type of tray you are installing and the surface it’s being installed on. The main rule of thumb when it comes to any job such as this is to keep it as simple as possible. Go with most suitable type of tray for the room space you have and go with the most straightforward method of getting the waste water from eth tray to the main drainage point. Unfortunately in some cases, this may mean a compromise in terms of appearance. To find out how to fit both a raised or flat shower tray read on below. Should I install a raised or flat shower tray? You’ll need to cut out an access hatchin the floorboards next to the tray as this will allow you to reach the waste. A jigsaw is the ideal tool for this as it’ll allow you to be more precise with your cutting. Step 3 - Cut Waste Hole
- Fruugo ID: 258392218-563234582
- EAN: 764486781913
-
Sold by: Fruugo