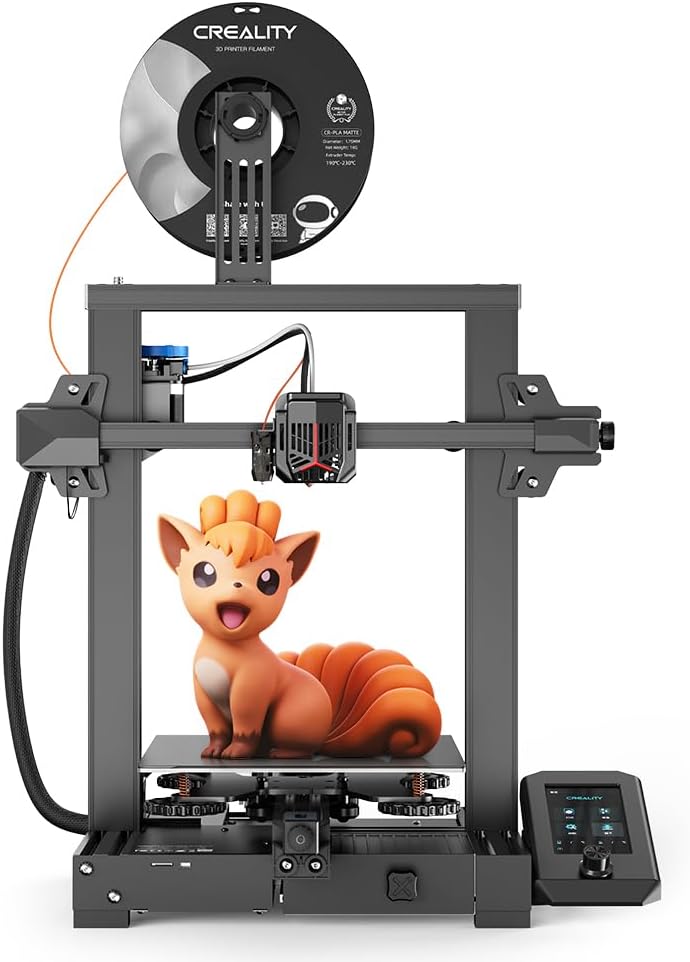
Official Creality Ender 3 V2 Neo 3D Printer, CR Touch, Full-metal Bowden Extruder, Model Preview with New UI, Stable Integrated Design, PC Spring Steel Magnetic Plate, Printing Size 220 * 220 * 250mm
FREE Shipping
Official Creality Ender 3 V2 Neo 3D Printer, CR Touch, Full-metal Bowden Extruder, Model Preview with New UI, Stable Integrated Design, PC Spring Steel Magnetic Plate, Printing Size 220 * 220 * 250mm
- Brand: Unbranded
Official Creality Ender 3 V2 Neo 3D Printer, CR Touch, Full-metal Bowden Extruder, Model Preview with New UI, Stable Integrated Design, PC Spring Steel Magnetic Plate, Printing Size 220 * 220 * 250mm
- Brand: Unbranded
| RRP: | |
| Price: |

Description
So we brought out the classic speed test tower. In this test, the printer starts printing this model at a low speed and gradually increases print speed as it goes higher up the tower. For every 12.5 mm increase in height, the print speed increases by 20 mm/s. The spool-holder dowel is held in place on the spool holder with a plastic nut, about an inch in diameter. The nut comes attached to the dowel and should unscrew from it in a manner similar to opening a child-proof cap to a pill bottle. Try as I might, though, I couldn’t get the nut to budge by hand. I ultimately had to remove it using a wrench that could open wide enough to securely grasp it. Creality's Ender-5 Pro, which I tested concurrently with the V2, uses the same dowel-and-nut combo, but I was able to separate them on the first try, no wrench needed. To work the display, you have to rotate the knob, which takes you through the different options. To select an option, you push on the knob, which makes a rather loud popping sound. The “Neo” in Creality Ender 3 V2 Neo means “new,” but that doesn’t mean everything about it is new. It inherits many features from its predecessor, the Creality Ender 3 V2. Build Volume
While PC spring steel plate has very good adhesion, it can be hard to remove prints even with the ability to bend the build plate. The carborundum plate on the Ender 3 V2 is a better overall build surface in our experience, since prints are much easier to remove once the bed cools without any need for removing the bed surface. We’ve also found that it’s far easier to damage the PC surface of the steel build plate if the first layer leveling is too low. We’ve analyzed these two varieties of build plates in more detail in our bed material guide. Manually leveling your bed is tedious. So if your print bed remains in one flat position for long, you won’t have to do it all the time. Full Metal Bowden Extruder Perhaps the biggest game changer for the Ender 3 V2 Neo is the CR-Touch auto-leveling system. It uses a touch probe to automatically scan 16 separate points on the bed before each print to discover and adjust for any unevenness on the platform. This ensures ensures level accuracy and a consistently high-quality first layer. The automatic bed leveling dramatically improves the 3D printing experience, as it eliminates the hassle of manual levelling altogether. Usability and Ease of Assembly If you still want to try printing with TPU, you need to calibrate the retraction well. Flexible filaments are sensitive to incorrect retraction settings. Stringing is difficult to control with a Bowden extruder for flexible filaments. As you can see, the quality of the print was consistent until around 100 – 120 mm/s. At this printing speed, we notice some inconsistencies in the bonding between the layers, and some slight stringing starts. But still, it wasn’t horrendous. Minimum Layer HeightThe Ender 3 V2 Neo borrows its powder-coated (PC) flexible magnetic spring steel build plate from its more premium cousin, the Creality Ender 3 S1. The PC spring steel plate offers excellent adhesion, requires little to no cleaning (even after dozens of prints), and is remarkably user-friendly. Owing to its rigidity, the steel plate makes it a hassle-free experience to remove it from the printer and get the prints off of it. All you need to do is flex the plate and off comes the print. The power recovery feature is a convenient feature that is now standard on the Ender 3 Neo series. It protects your work-in-progress 3D prints against interruptions due to power outages. You can resume the 3D printing from where it stopped and continue the process without any hiccups. If your power is out for an extended period of time, it’s unlikely you’ll be able to resume the print because the bed will have cooled and released the partially-printed model, but if you live in an area with frequent power hiccups, this feature can save your in-progress prints. Differences between the Ender 3 Neo and Ender 3 V2 Neo
The Ender 3 Neo requires a substantial amount of work to assemble, even though Creality ships it partially assembled. Out of the box, it takes at least an hour to assemble and set up, and may take longer if you are not experienced with 3D printers. Therefore, if you want the highest level of definition in your prints, try printing at the minimum layer height. The Ender-3 V2 Neo has a minimum layer height of 0.1 mm with the default being 0.2 mm, same as the original Ender range. Silent Stepper Drivers - Older 3D printers such as the Creality CR-10 produce a song-like sound when printing due to the frequencies of the motors moving. Newer electronics prevent this issue, making the printer substantially quieter. The only sound you will hear are the fans, which is much easier to ignore. The real test, though, is in the printing. If the object you're trying to print pulls off the bed, or if it adheres better on one side of the platform than the other, it's still out of alignment, and so you'll have to tweak it again. Also, even when it is set properly, the bed can lose alignment over time and have to be readjusted. There are a few other minor differences between the Ender 3 Neo and Ender 3 V2 Neo, which are not dealmakers or dealbreakers in themselves. Still, they are some nice-to-haves for the more premium model. These include an integrated toolbox and belt tensioners, which add to the improved usability and polish of the Ender 3 V2 Neo.
The machine settings should be defined as shown in the screenshot above. This way, Cura knows how big the printer and its print head is. The PC-coated flexible magnetic spring steel build plate on the Ender 3 V2 Neo offers excellent adhesion and a hassle-free usage experience. A little flex of the bed material is all it takes to separate the 3D prints. The smooth bed surface requires little to no cleaning. However, the bed surface is more susceptible to damage than other materials, and it can be difficult to remove prints in some cases. Therefore, often, as with the Ender 3 V2 Neo, you can copy the settings from Creality Slicer and paste them into Cura. A time-saving alternative would be to export the printer settings profile and import it into Cura. You then only have to manually transfer the machine settings when creating a new printer profile. If you are looking for the most affordable Ender 3 that still has most modern features, these two 3D printers are worth considering. In this article, we’ll compare these two lower-end models, the Ender 3 Neo and Ender 3 V2 Neo, with each other to help you figure out if the latter is worth the extra price.
- Fruugo ID: 258392218-563234582
- EAN: 764486781913
-
Sold by: Fruugo